Loading...
Loading...
Loading...
Loading...
Loading...
Loading...
Loading...
Loading...
Loading...
Loading...
Loading...
Loading...
Loading...
Loading...
Loading...
The Online Dashboard is where the cloud services behind your coherence-based game can be managed. It can be found at https://coherence.io/dashboard.
Here are some examples of tasks to perform on the Online Dashboard:
Create your organization and project for your game
Start/stop/restart your cloud-based Replication Server or Simulator
Enable coherence features such as player authentication, key-value store, persistence, and build sharing
Invite teammates to your project
Cost analysis: view your resource usage and billing forecasts
While a local Replication Server is available as part of the Unity SDK, in order to host multiplayer services like the Replication Server in the cloud, your team must have a project in the Online Dashboard. It is up to your project needs when to begin using the cloud services.
Please see the page Create a free account in the Get Started section.
Please see the article on using the coherence Cloud in Unity.
Comprehensive hosting, scaling, and networking for your game
In addition to our SDK, coherence offers a comprehensive easy-to-manage platform for hosting and scaling the backend for your multiplayer game. Our cloud platform can scale your project from its early development to millions of players and saves time and resources you can dedicate to creating your game instead of operating it.
For your session-based experiences, we host and manage our Replication Server for your project. Through our SDK, Game Clients create Rooms and Lobbies on our backend. Our backend can scale your project from a handful of players to millions as traffic demands.
For persistent multiplayer experiences, we offer World hosting. Easily configure and launch persistent Worlds through our online Online Dashboard, and scale them as needed. Create worlds across different regions with our global backend so you players have the best experience from any part of the world.
With our cloud platform, your team can collaborate on your project's hosted resources through our easy-to-use online Dashboard. Easily add team members, manage your projects, and get a clear picture of your project's resources and usage. View your game's Rooms and Worlds in real-time, and get access to logs for all your hosted resources.
For projects with a large projected online player base, we offer Enterprise Support Programs to help ensure the most efficient possible implementation of your project, as well as a smooth launch in every region your players are in.
To learn more, please drop us an email at devrel@coherence.io.
In the subsections of this page you will find example usages of the GameServices API that can be found in CloudService.GameServices.
coherence provides an API for creating player game accounts that uniquely identify players across multiple devices. An account is required in order to use the rest of the online services, like the key-value store and matchmaking.
There are two types of accounts that are currently supported - guest accounts and user accounts.
Guest accounts provide an easy way to start using the coherence online services without providing any user interface for user names or password. Everything is controlled with the API, and is completely transparent to the player.
The session data for the account is stored locally on the device so it is important to know that uninstalling the game will also wipe out all the data and the account will be no longer accessible even if the player installs the game again.
User accounts require explicit authorization by the player. Currently, only user name and password are supported as means for authentication. The user interface for entering the credentials must be provided by the game. Check the API how to use this feature.
In the future, there will be support for many more authentication mechanisms like Steam, Google Play Games, Sign in with Apple, etc.
By default, all accounts created in your project will be transient, which means that they will not be stored in the Database.
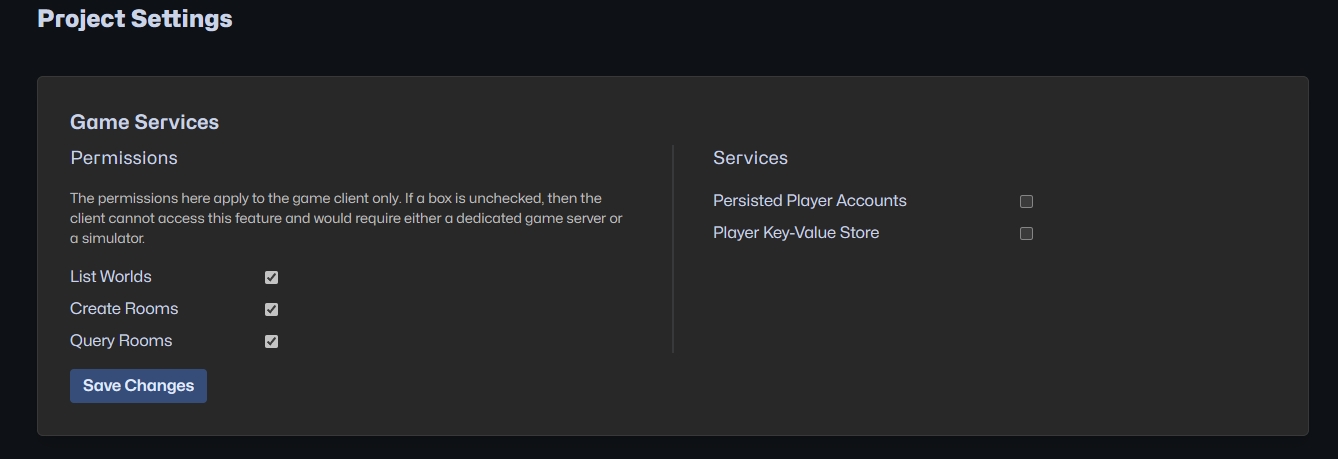
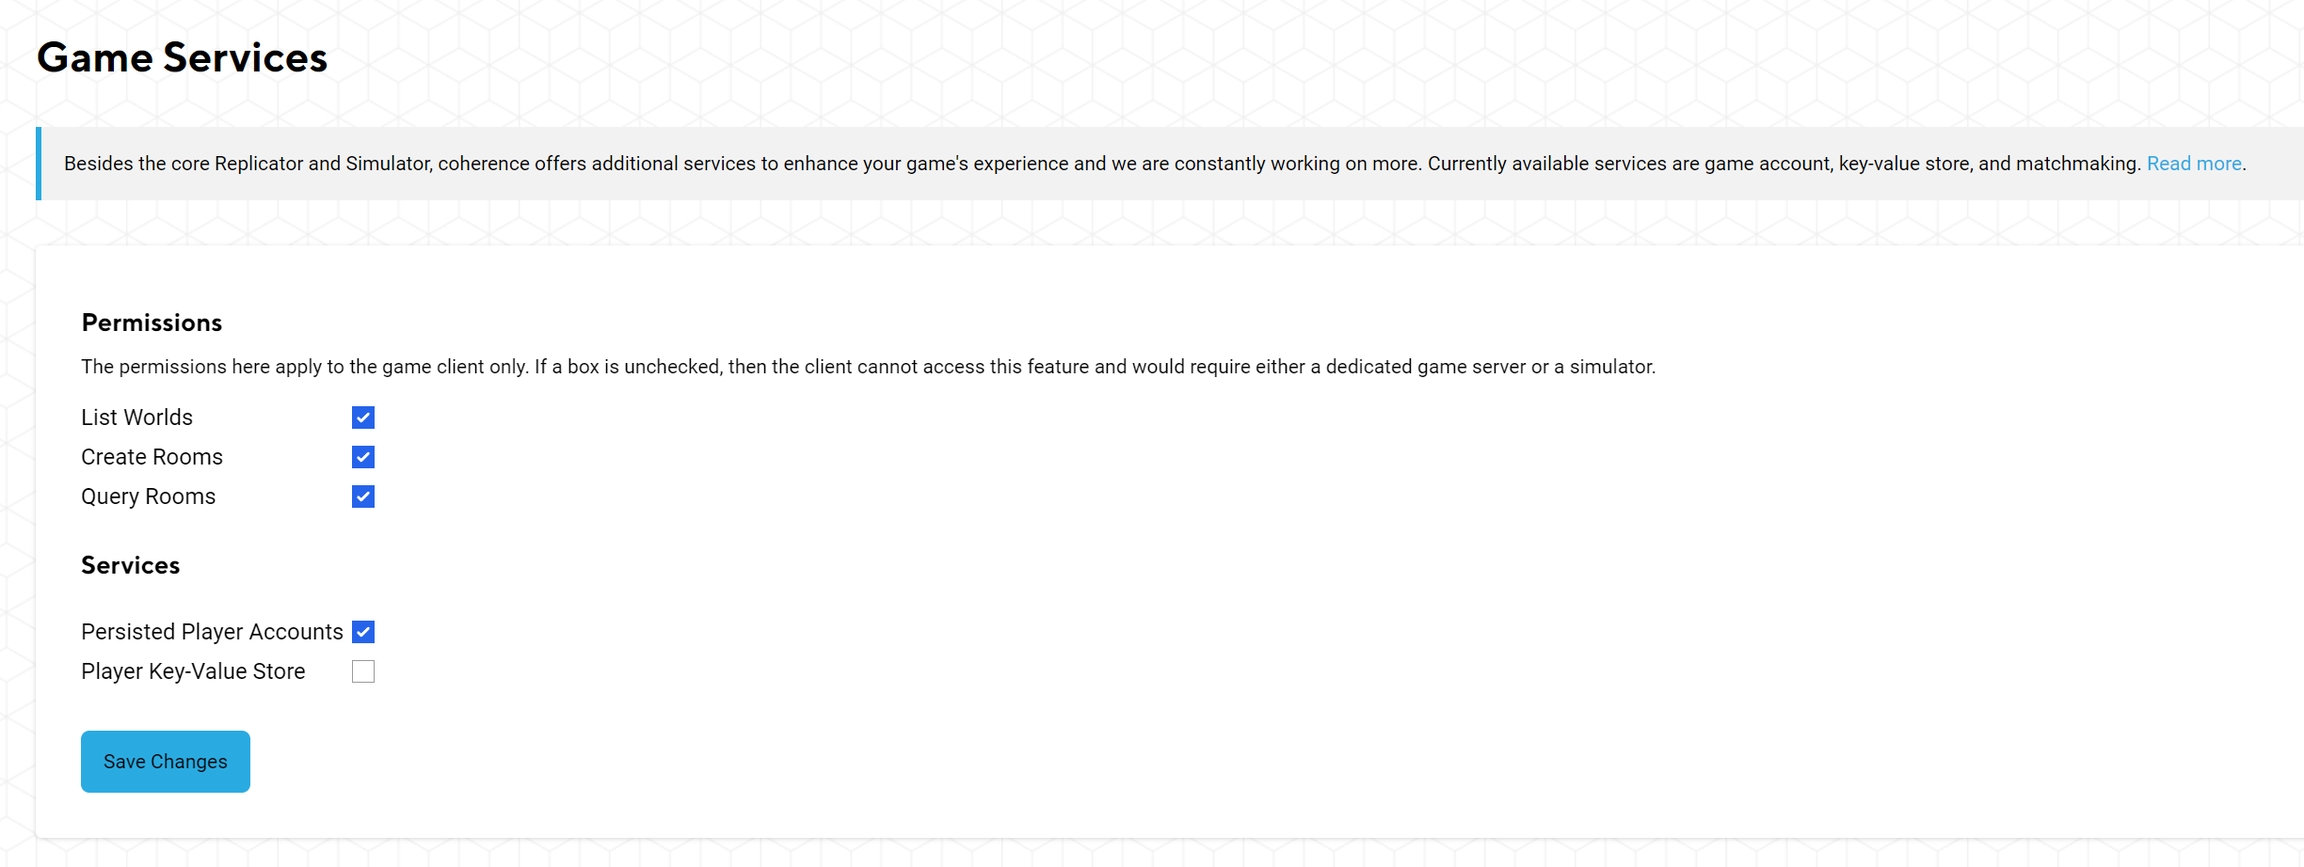
If you want your player accounts to persist, you can enable the feature in the Dashboard, in the Game Services section:
Please refer to the Cloud Service API: Authentication Service.
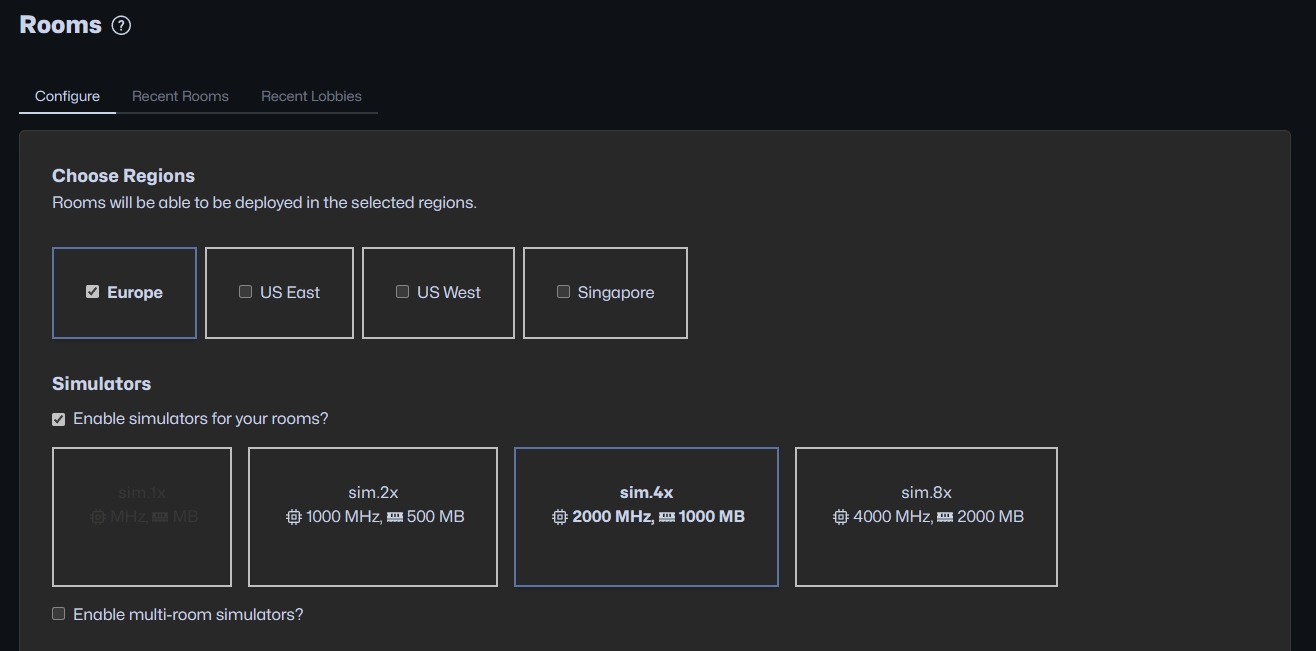
From the Online Dashboard, you can configure how Rooms are created through the SDK in the coherence cloud.
From the left sidebar, select Rooms. On this page you can:
choose the regions you want to allow your rooms to be created in
enable Simulators for your Rooms
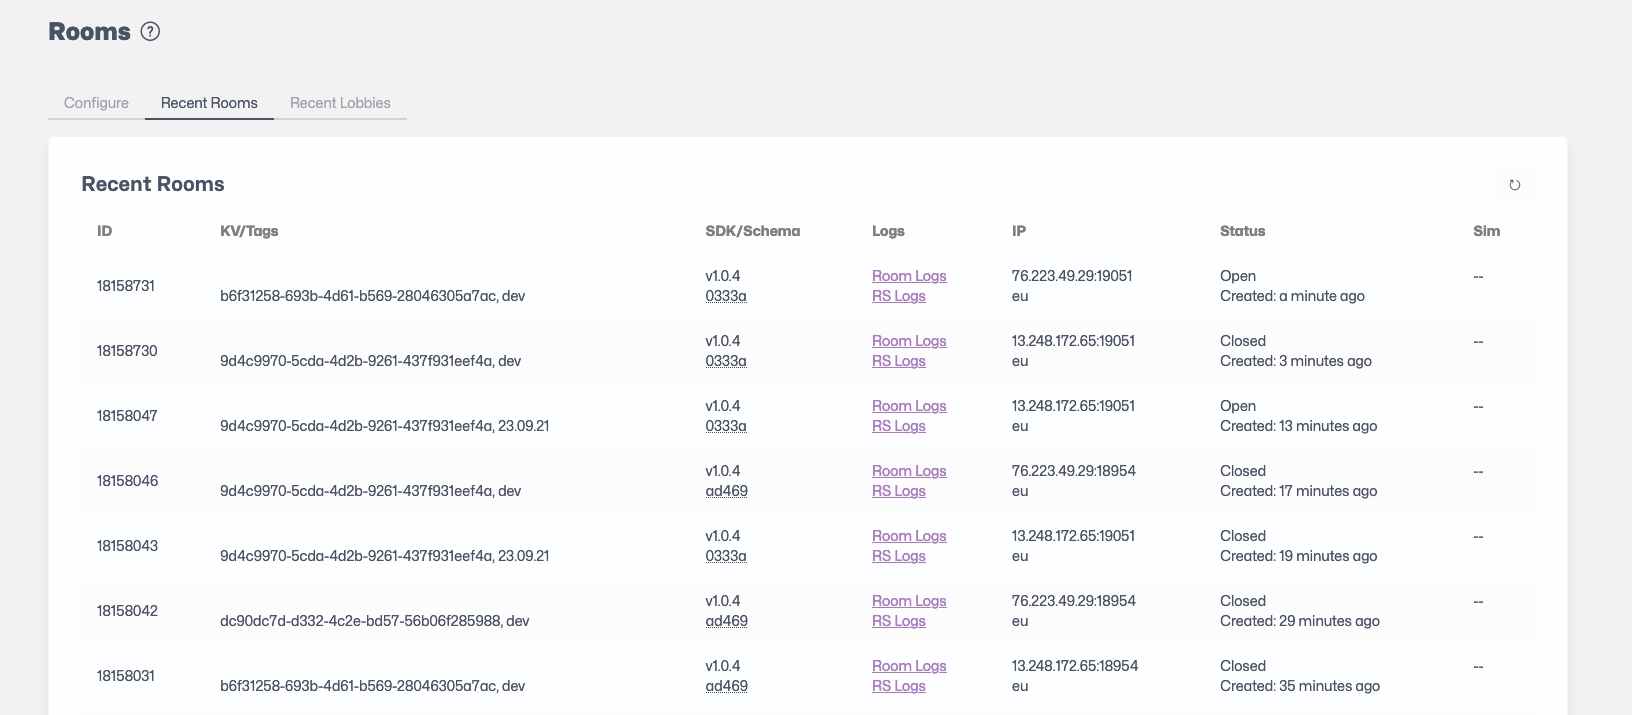
view a list of recently created Rooms
view a list of recently uploaded Simulators
From the Online Dashboard, you can configure what size you want your Simulator instances to be. To attach a Simulator to a Room, send the "Simulator slug" uploaded through the SDK with the Rooms creation request. When using the Unity Cloud Service API to create Rooms, the Simulator uploaded through the SDK is automatically assigned in the creation request.
The packet frequencies for sending and receiving data can be adjusted per project. It is part of the Advanced Config section and adjusting the frequencies is available only for paid plans.
The Recent Rooms Table provide a quick view of the recently created Rooms with the following information per column:
Please refer to the Cloud Service API: Rooms section.
Rooms are automatically closed within a few minutes after the last player has left the room. This can be changed in the Advanced Config section.
Current limits for Rooms are as follows: Players
The default setting is 10 players hosted, but you can specify your own value anywhere between 2 and 100 players.
To support more than a 100 players per room, write to devrel@coherence.io
Entities
1000 by default, but can be increased up to 65535 in local development or client-hosted scenarios.
There is no UI button for increasing the supported player count, so you need to work through our Rooms API.
When creating a room viaReplicationServerRoomsService.CreateRoom you can pass SelfHostedRoomCreationOptions as creation options.\
To change the Entity limit just set the SelfHostedRoomCreationOptions.MaxEntities to a desired value.
Besides the core Replication Server and Simulator, coherence offers additional services to enhance your game's experience and we are constantly working on more.
Currently available services are:
In the Project sidebar, you can find links to each service. Each service has an enabled checkbox which you can tick to enable and disable those features:
Disabling a service will immediately remove that functionality from your game. Please disable with caution.
In order to access coherence Cloud features from the Unity SDK, you can use the CloudService instance in the component.
With the CloudService instance, and after completing login (see and example code for an example), you will be able to fetch the existing of your project, create new , delete and fetch existing , as well as access the various available .
In the subsections of this page, you will be able to find detailed usage examples of each feature from the .
In the inspector of a instance, you will find two settings related with the coherence Cloud:
Auto Login As Guest: If enabled, Cloud Service will automatically log in with the coherence Cloud using a player Guest Account. If you want to handle logins manually in your game, turn this option off.
Cloud Unique ID: Uniquely identify the Cloud Service used by this CoherenceBridge. It will be used to cache the player account credentials. If it is not specified, one will be autogenerated.
A way to do matchmaking using coherence Player accounts.
A lobby is a virtual room that is not backed by a . Lobbies have attributes and contain up to a certain number of players. Players also have attributes and can exchange messages in real time.
Matchmaking is the process of grouping players together based on a certain game-specific criteria.
The entire process consists of three phases - Matchmaking, Lobby Session and Game Session. The phases happen in exactly this order. Not all phases are mandatory.
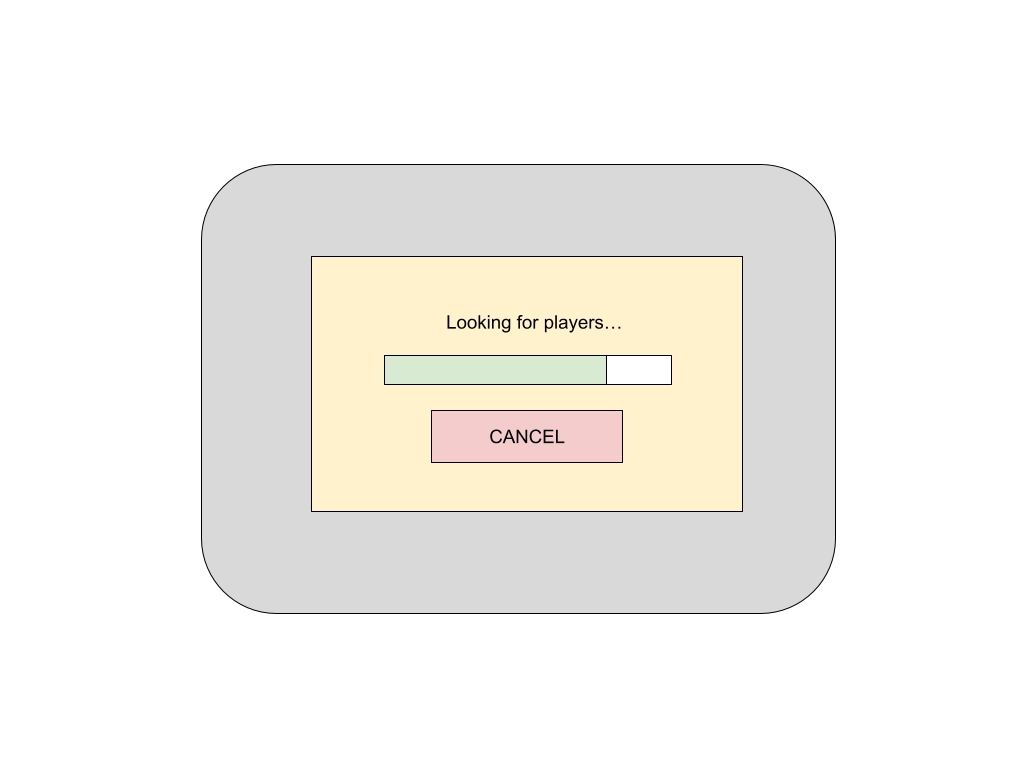
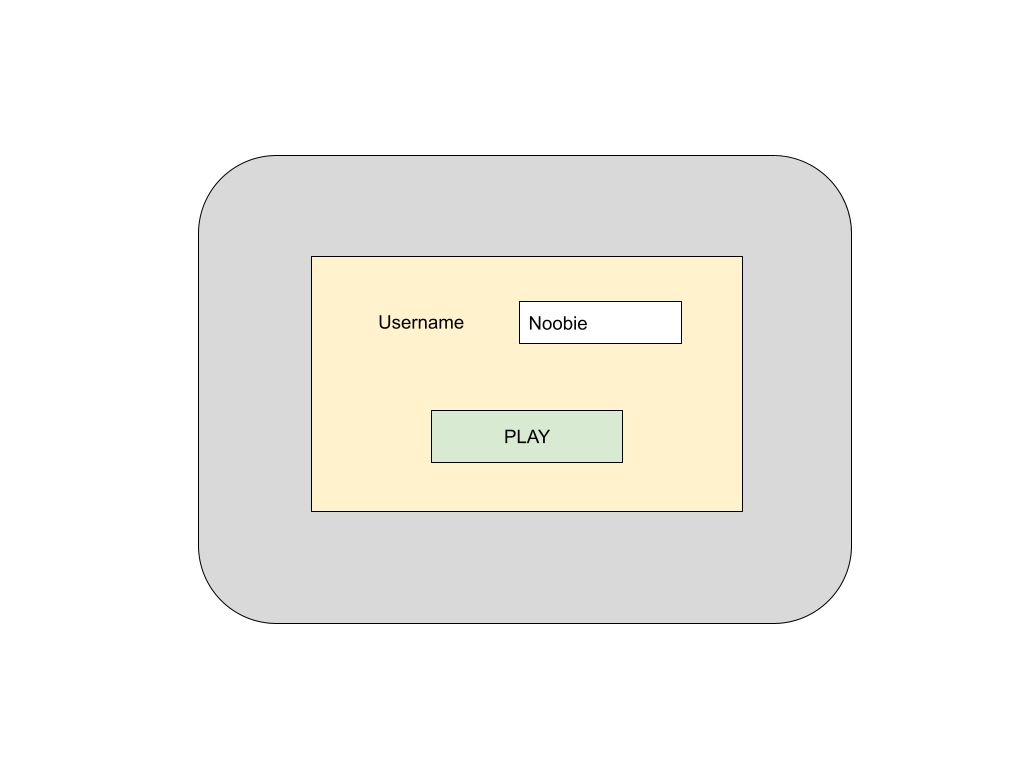
The matchmaking phase is where players are grouped together based on certain criteria. In the case where players just want to jump into the game, the interface can be very simple - press the button to find other players to play with and that’s it.
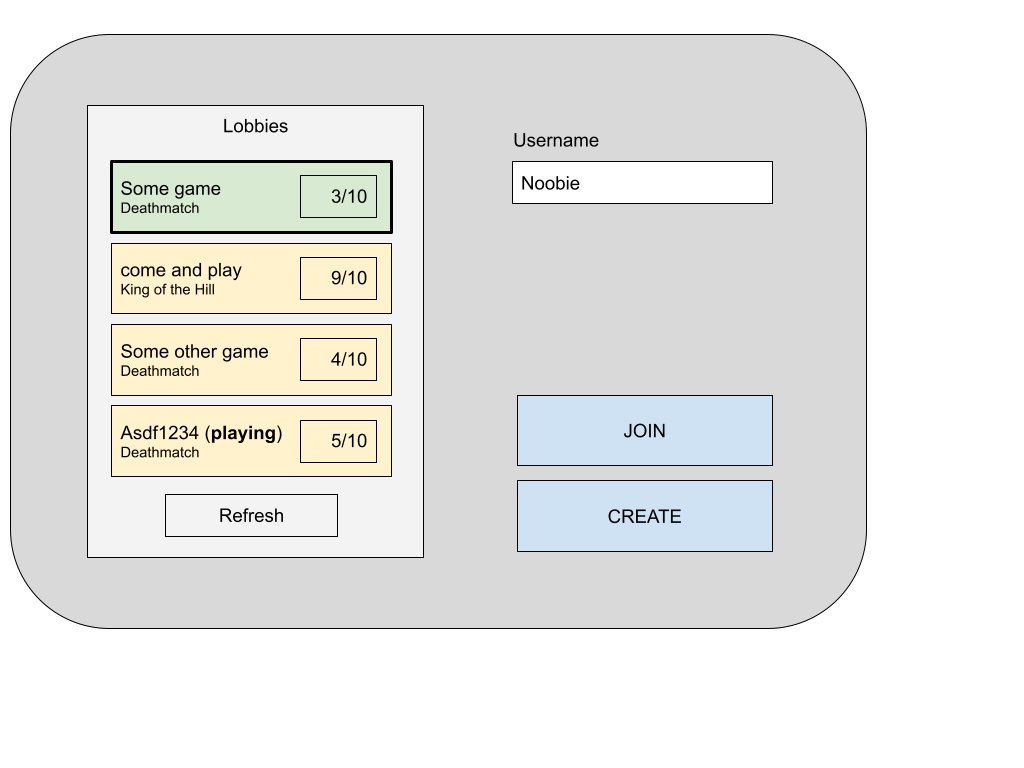
The matching logic underneath is entirely game-specific so it is up to the developer to properly use the Lobby API in order to get the best possible result. To players it may look deceptively simple on the surface but under the hood the logic can get quite complex. Some games may require more sophisticated matchmaking logic so the matchmaking phase can be represented by an advanced UI that allows players themselves to create, browse and join lobbies on their own.
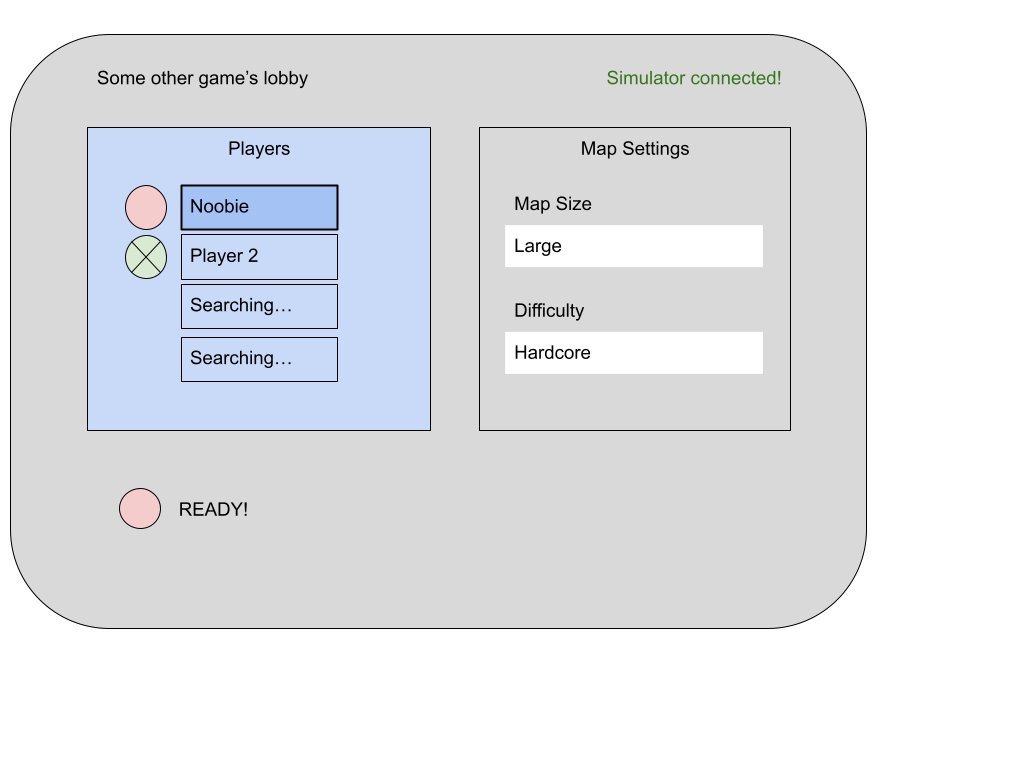
In the mockup above, Lobbies are filtered using the same matchmaking logic as in the previous scenario. The difference is that more than one result can be returned so players get to choose the best possible match out of the already curated list.
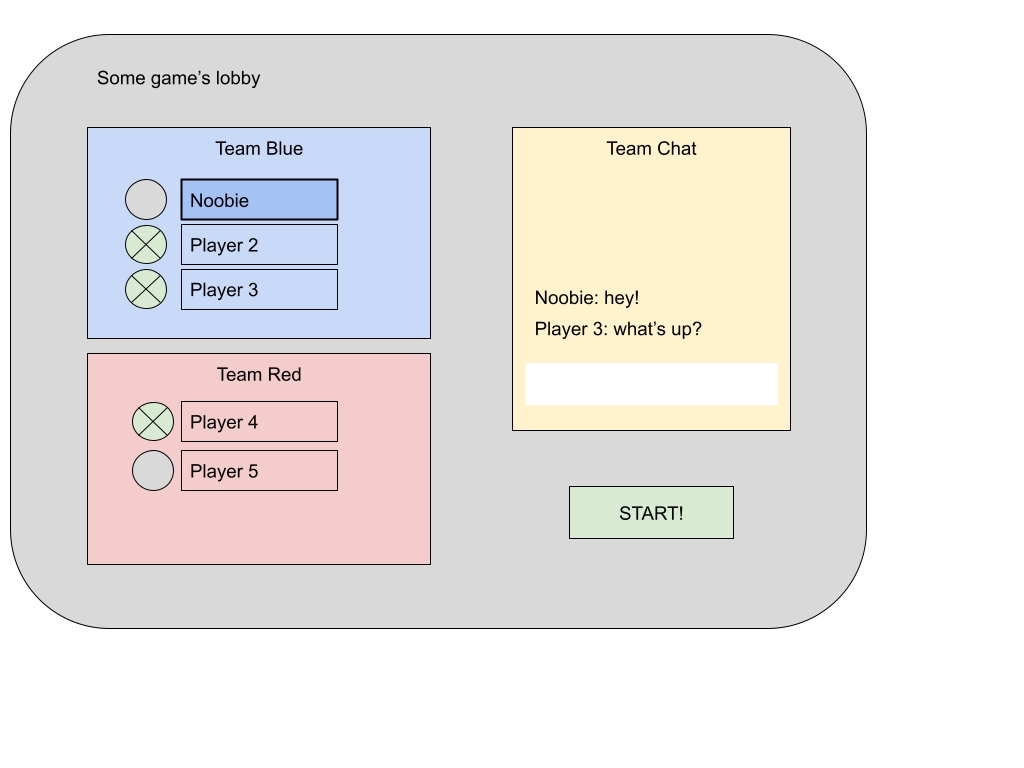
The Lobby Session phase begins once the player has found and joined a Lobby. Inside the Lobby players can exchange messages and have their data attributes synchronized until everyone is ready to start the game.
The first player to join a Lobby becomes the owner. There can only be one owner. Only the owner can change Lobby attributes and start the game. If the owner leaves the Lobby, one of the other players becomes the new owner.
Deciding when to start the game as an owner is entirely game-specific, and even the fact that a Lobby owner exists can be a hidden implementation detail and not exposed to the players. Alternatively, you may want to give the power to the Lobby owner to start the game whenever they want through an UI action. It is up to the game to decide how Lobby owners are handled.
Players can leave the lobby and new players can join at any time until the Lobby is full or until it is manually closed. Empty Lobbies are automatically deleted 5 minutes after the last player has left both the Lobby and the associated Replication Server Room (this can be adjusted on the project Dashboard). A couple of Lobby examples are shown below. You as the game developer have full freedom to come up with the logic and UX suited for your game.
Once enough players have joined the lobby the owner can start the game.
What we call the game phase is playing the game in a Room hosted by a Replication Server.
The process of creating Rooms and connecting all players at the same time, which can be quite complex to orchestrate, is handled by the SDK/backend.
When the Game Session starts, every player in the Lobby will receive a callback in Unity through the Lobby API with the Room endpoint data so they can connect to the Replication Server Room.
If no game-specific callback is registered, coherence will automatically connect the player to the Room using the CoherenceBridge component.
The Lobby still exists while the players are connected to the Replication Server. If you happen to disconnect or close your game and then log into the coherence Cloud again, the successful Login response will have the Room endpoint data available so you can reconnect and continue the Game Session phase.
When a Lobby is created, it can be either public or unlisted. Public Lobbies can be matched/searched and then joined by anybody. Unlisted Lobbies can be joined only if the player knows the Lobby ID. If a player leaves the Lobby they can rejoin again at any time.
When players start the Game Session, the Lobby can be optionally set to unlisted or closed as part of the process. If neither is set then the lobby remains in whatever state it was, i.e. either public or unlisted. In addition it is also marked as “in-game” (a room number is attached to the Lobby). Players can either choose to stay in the Lobby while in the game or leave the Lobby when they join the game.
Closed Lobbies can still contain players, i.e. if a Lobby is closed this doesn’t kick out the players. New players cannot join, only players who were in the Lobby when it closed can leave and rejoin. Closed Lobbies cannot be reopened.
Inactive players with no connection to the backend are removed from the Lobby after 1 minute. They can rejoin if the Lobby is not full.
When the last player has left both the Lobby and the associated RS room (if any), then and only then the Lobby is deleted after 5 minutes of inactivity.
In order to be able to use the Lobbies feature, you must enable Persisted Player Accounts in the Game Services section of your Project dashboard settings.
Since Lobbies use under the hood for the Game Session, you must also have at least one region enabled in the Rooms section of your dashboard.
cannot currently use lobbies because a valid player account is required.
Accessible from CoherenceBridge.CloudService.CloudRooms, the Lobbies Service API has access to every endpoint you need to interface with the Lobbies feature.
Attributes are one of the main avenues available for customizing the Lobbies logic and fitting it to the needs of your game project.
Every Player in the Lobby and the Lobby itself can have custom Attributes associated to them.
An Attribute is defined by:
Key: Identifier for the Attribute.
Value: Value of the Attribute, can be either an integer number or a string.
Index: A predetermined value that will allow the Attribute to be used in Filter Expressions.
Aggregate: This only applies to the lobby indexes and can be: “sum”, “avg”, “min”, “max” or “owner” for the integer indexes or “owner” for the string indexes. When a player joins/leaves the lobby their indexes are aggregated into the lobby indexes.
Public: Public Attributes will be returned and visible to all Players.
Player or Lobby Attributes cannot be deleted, you can only add new ones or update existing ones.
If you wish to stop using an Attribute, we recommend setting a default value that you can interpret as such, like an empty string for a string Attribute, or a zero value for an integer Attribute.
Indexed Attributes are aggregated from the Player Attributes into a Lobby Attribute.
For example, let's say every Player in my Lobby has a Matchmaking integer rating value Attribute associated to him, and we index this Attribute to n1.
We want Players to be able to do Matchmaking with Lobbies using the average Matchmaking rating of all the players present in the Lobby. The Lobby will have a "Matchmaking rating average" integer Attribute associated with it, that is also indexed to n1, with an aggregator of type "avg" to do the average of every Player present in the Lobby.
Every time a Player joins or leaves the Lobby, the Lobby Attribute indexed to n1 will be updated accordingly.
When you're entering the Matchmaking phase, you can use a Lobby Filter Expression to search for specific Lobbies that match the current rating of the Player that is initiating the Matchmaking phase.
In order to start the Matchmaking process, you can use the FindOrCreateLobby method. Based on the given parameters to find a Lobby, the response of this method will be either an existing Lobby or a fresh new Lobby where your player will be the owner.
The bread and butter of the Matchmaking logic can be done through our powerful filter expression building system. The FindOrCreateLobby method accepts up to three different filters.
This is similar to the WHERE clause in an SQL-like expression. You can build filter expressions using Lobby Attribute indexes and most of the Lobby properties.
The player can use up to three filter expressions to filter out Lobbies. The expressions are tried in order until one of them succeeds. This can be used to increasingly expand the search criteria and can be very efficient if the amount of players is low.
Currently, these are the properties that you can use to customize your Matchmaking process:
Room Regions
Tags
Max Players
Number of Players
Available Slots
Simulator Slug
Is Private Lobby
Integer Attribute Index
String Attribute Index
For example:
“region in [‘us’, ‘eu’] and (s1 = ‘map1’ or s1 = ‘map2’)”
In Unity, you will build this filter expression using the builder pattern, if we wanted to match using the expression from the example, we would do it like this:
When you successfully join a Lobby, an instance of type LobbySession will be returned via the Lobbies API.
You can use this LobbySession instance to interface with the Lobby itself, you will find methods to leave the Lobby, update your Player Attributes or send a message to other Players. You will also be able to query all the information about the Lobby itself, like every Player present, their Attributes, maximum Players and other Lobby properties.
Additionally, if you're the owner of the Lobby, you will have an instance of type LobbyOwnerActions available to you (for non-owners this instance will be null referenced). As an owner of the Lobby, you will be able to kick other Players, update the Attributes of the Lobby, or start the Game Session.
LobbySession instance will have a number of callbacks you can subscribe to that will inform you of any updates that happen to the Lobby, like a Player joining or leaving, or Attributes being updated.
If a Room associated with a Lobby is closed, Players will also receive a callback.
When the owner of the Lobby starts the Game Session, every Player will receive a callback with the Room endpoint data that can be used to connect to the Replication Server using the associated CoherenceBridge instance.
If you need to perform custom logic before actually joining the Room, you can subscribe a custom listener through the LobbiesService instance in CoherenceBridge.CloudService.Rooms.LobbyService.OnPlaySessionStarted. If no custom listener is registered, coherence will automatically connect to the Replication Server.
If the player has closed the game abruptly without leaving the Lobby, when the game is restarted and the Player authenticates with the coherence Cloud, in the Login response you will receive the ID of the Lobbies that the Player is currently a part of. You can use these Lobby IDs to fetch again the LobbySession instance from the Lobbies Service API.
Additionally, the Lobby might have a current Game Session active, so you can use the Room data that is available to reconnect to the Replication Server Room.
Here is an example of how to handle this scenario:
coherence provides an API and a database for storing key-value pairs from within game sessions.
The key-value store provides a simple way to store and retrieve data for the currently logged in player. For example, you could store the player's score, email address, or any other data.
This feature requires a .
The keys must be alphanumerical strings, underscore or dash. Currently, only strings are accepted as values. If you need to store numbers or complex types like arrays, you have to convert them to strings.
The total amount of stored data (keys + values) cannot exceed 256 KB per player (TBD).
There is no limit how often the data is stored or retrieved.
Please refer to the .
After enabling at least one region in the , you can use the CloudService.Rooms API to create Rooms and delete and fetch existing Rooms. After fetching an existing Room, you can join it via the CoherenceBridge.JoinRoom method:
The key-value store provides a simple persistence layer for the players.
The player needs need to be to use the key-value store.
This class provides the methods to set, get and unset key-value pairs. This is executed within the context of the currently logged in player.
Size: there are no limits to the number of stored key/values as long as the total size is less than 256 kB.
Requests: Set/Get/Unset can be called unlimited amount of times but the execution may be throttled.
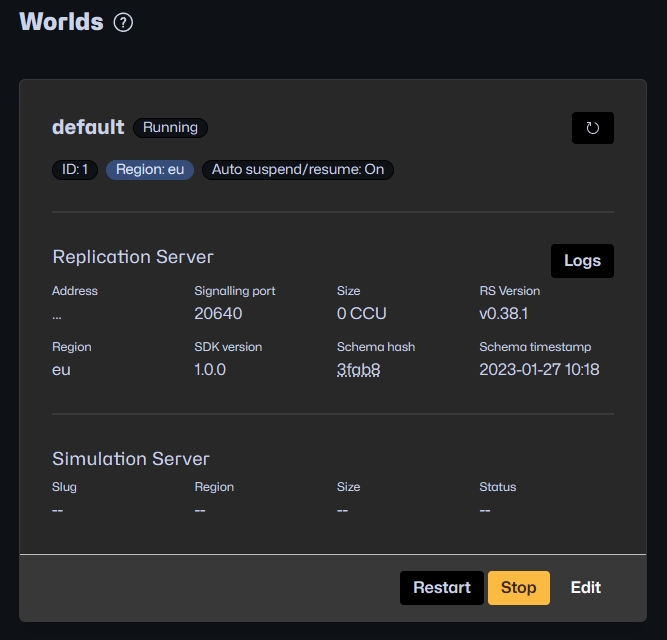
From the Online Dashboard you can create, edit and configure your Worlds
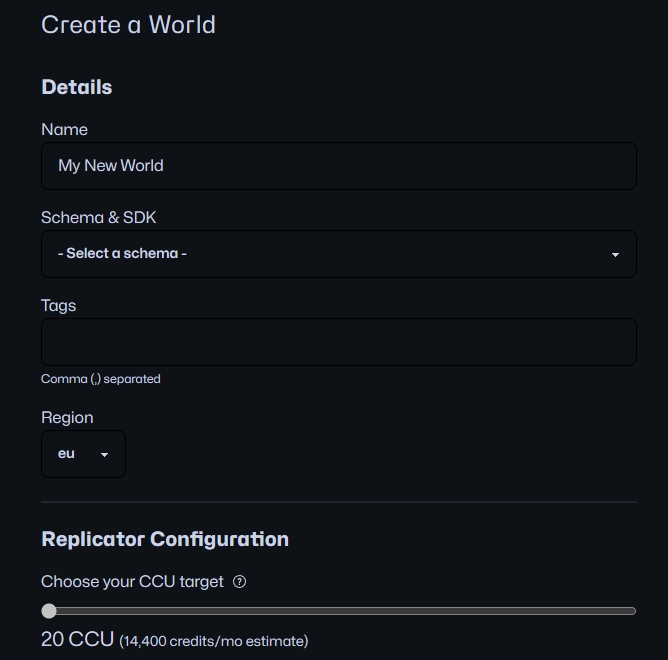
Click the Create a World button at the top right of the Worlds view in the Online Dashboard.
To create a World:
Enter a unique name
(optional) choose an SDK version. The latest version is recommended, but this should match the SDK version installed for your project
Enter tags separated by commas
Choose which region the World should be started in
Choose the size of the Replicator
(optional) Choose the schema this World should start with. Usually, the latest schema uploaded is the preferred choice, and this is the default.
(optional) Adjust the packet frequencies for sending and receiving data. It can be adjusted per project and is part of the Advanced Config section. Note that the adjustment of frequencies is accessible only for paid plans.
The state of the World is automatically managed by default. Inactive Worlds with no connected players are suspended and then resumed when there are players online. Suspended Worlds retain their state and it only takes seconds to bring them back up and running.
This feature can reduce costs significantly so we recommend keeping it on.
However, it is possible to turn it off by visiting the Advanced section of the World Configuration page.
The autoprovisioning feature can only be turned off if you have a paid tier subscription. It is always enabled for running Worlds for customers on the free plan.
After creating a in the , you can join it from your Unity Project using the CloudService.Worlds API combined with the .
Here is an example:
| Column name | Description |
|---|---|
Please refer to the section.
Please refer to the .
ID
ID of the Room.
KV/Tags
Key-value pairs associated with the Room, followed by Tags attached to the Room.
SDK/Schema
SDK version used by the Room, followed by the Schema ID used by the Room.
Logs
Allows viewing Room logs and Replication Server (RS) logs.
IP
IP address of the Replication Server attached to the Room, followed by a region indicator.
Room Status
Status of the Room (Open or Closed).
Created
Time duration since the Room creation.
Sim Status
Status of the Simulator attached to the Room (Starting, Started, Stopped).
Sim
Sim Slug for the Room.
Messages
Messages from the Simulator orchestration. This field is usually empty but will contain a message if an issue happened with the Simulator life-cycle. The message provides the reason for the Simulator's current state (usually Stopped). Once a Simulator is stopped (for Room inactivity for instance), the Message column will mention Idle-stopped.
By default, the CloudService will automatically authenticate as a Guest User, unless you disable Auto Login As Guest option in the CoherenceBridge inspector.
If you disable the automatic login, you can handle Player authentication manually through the CloudService.GameServices.AuthService API.
In this example, you can see how you can manually login as a Guest:
You can also choose to allow your users to create their own Player accounts, you can use the Authentication Service API in a similar fashion to allow for manual authentication:


